Category Archives: Mediterranean Food

Za’atar chicken with pilaf, flat bread and green harissa

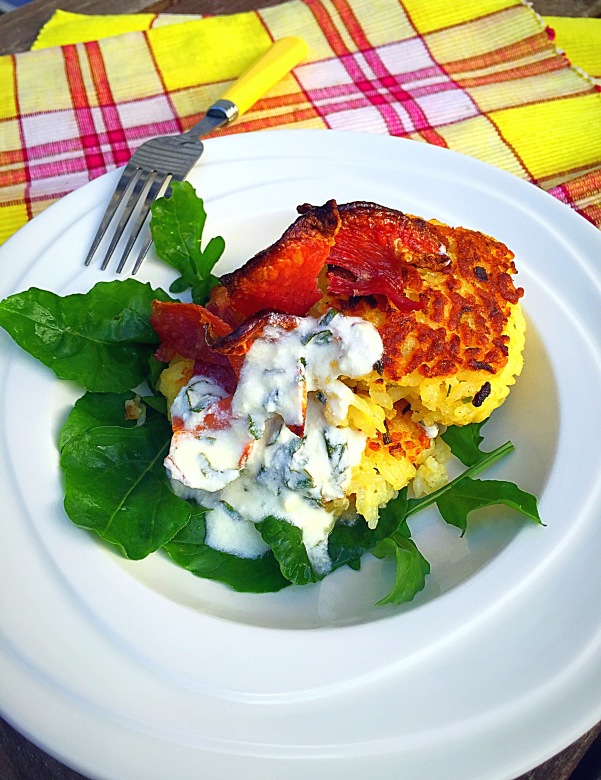
Well hello again my friends! After my last post, where I taught you something quick to make, I thought I’d share something which would be more of a usual for me (but more timely) recipe. As I mentioned before my time in the kitchen is my therapy! This dish, while a ‘little’ time consuming, will throw a party in your mouth and I promise you that!

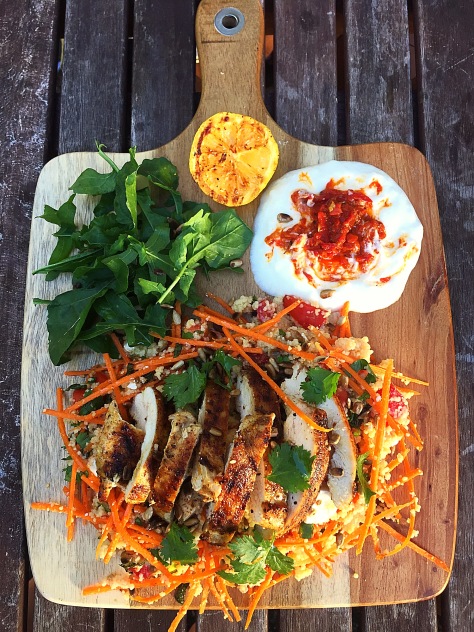
I wondered whether I should write some food for thought but who needs it when you have this in front of you! So give this beautiful Middle Eastern flavoured chicken a go and as usual I look forward to your comments, messages etc. Much love xx
2016-08-02 15.33.18-1

Serves 4

Ingredients:

For chicken:

  • 2 heads of garlic, top cut off to expose the cloves
  • 1/4 cup olive oil
  • 4 tbsp butter
  • 2 tbsp fresh or dried rosemary leaves, chopped
  • 1 fresh chile, seeded and finely chopped
  • Grated zest and juice of 1 lemon (or orange)
  • 1 whole chicken
  • Za’atar spice blend (recipe follows)

For Za’atar spice blend:

  • 2 tbsp toasted sesame seeds
  • 2 tbsp ground sumac
  • 2 tbsp fresh thyme, finely chopped
  • 1 tbsp ground cumin
  • 1 tbsp fresh oregano, finely chopped
  • 1 tsp salt
  • 1 tsp black pepper

Combine all the ingredients. Store in an airtight container until ready to use.

For flat breads:

  • 1 1/4 cups all purpose flour
  • 1/2 tsp baking powder
  • 1/3 tsp sugar
  • 1/2 tsp salt
  • 3 1/2 tbsp milk
  • 2 tbsp butter
  • 1/4 cup plain yoghurt

For pilaf: 

  • 1 tsp butter
  • 12cup finely chopped onion
  • 1 carrot, grated
  • 1 tsp paprika
  • 1/2 tsp tumeric
  • 1 tsp cumin
  • 1/2 tsp cayenne pepper
  • 3-4 whole cloves
  • 1 cup basmati rice
  • 1 12 cups stock (chicken or vegetable)
  • Salt/pepper to taste
  • 1/4 cup raisins

For green harissa:

  • 1 cup coriander (cilantro) leaves
  • 1/3 cup olive oil
  • 1 tsp ground cumin
  • 2 fresh chillies (seeded for milder flavour)
  • 1 small bunch spinach, stemmed and chopped
  • Juice of 1/2 lemon

Combine the ingredients in a food processor and refrigerate until serving.

Preparation:

I start this dish the night before because it has to marinate overnight.

For chicken: 

Preheat the oven to 200C (400F). Drizzle the garlic heads with oil. Wrap in foil, and bake for about 45 min, or until tender. Let those cool.

Butterfly the chicken by removing the backbone and opening the chicken. (You can get your butcher to do this, if you’ve never done this before, although its pretty easy). I usually remove the backbone with a pair of strong kitchen scissors by cutting along each side of the backbone. Place the chicken inside down on a board or a plate and press on it to flatten it.

Squeeze the garlic out of the skins and mash with the 4 tbsp of softened butter. Combine with 1/4 cup olive oil, rosemary, chile, and lemon zest. Loosen the skin all over the chicken by gently putting your fingers under the skin and moving it around. Rub the butter mixture onto the meat under the skin. Do this gently as you don’t want to break the skin. Pierce the chicken with 2 metal skewers, diagonally through the leg breast and wing to help keep it flattened. Cover and let the chicken stand for an hour or overnight in the fridge.

2016-07-10 14.18.35

I cooked this chicken on a charcoal barbecue, so if you are confident to do so, go ahead, if not, cook it on a gas barbecue or the oven at 180C (250F).

Sprinkle the chicken with half of the Za’atar mix. Roast it until the skin is crispy and juices run clear. The timing of this will be different for your chosen method, but usually around 1.5 hours. Let the chicken rest once it’s cooked for about 15 minutes, then cut into quarters.

2016-07-11 16.45.09

For pilaf: 

Preheat a deep pan on medium heat. Melt butter in the pan. Fold in onions and stir well. Add in the carrot. Cook for 3-4 minutes until the onions and carrots are softened but not browned.

Add cumin, turmeric, cloves, paprika and cayenne pepper. Stir in the rice so it’s all evenly coated.

Stir in hot stock (it should be at the boiling temperature) and raisins. Cover the pot with a lid and let pilaf cook until rice is just under al dente. Turn off the heat and let it stand for 10 minutes or so. Fluff with a fork before serving. Add salt/pepper if needed.

2016-08-02 12.32.53-1

For flat breads:

Once the chicken is ready (whether you are using a barbecue or an oven) you can cook these breads.

Mix flour, baking powder, sugar and salt in a bowl.

In a small saucepan heat milk together with butter until melted. You can also do this in a microwave. Let the milk cool down slightly.

In a big bowl add yoghurt and stir in warm (not hot!) milk until smooth.

Add the dry ingredients and stir with a spoon, until the ingredients come together.

Knead the dough until soft. Cover and let it rest for at least 1/2 hour at room temperature.

Split dough in 8 equal parts, form each of them into a ball, flatten with your fingers and then roll out into a disk, flipping it over occasionally. Sprinkle with flour now and then. Your bread should be about 10 cm in diameter more or less ( don’t worry about getting it perfect).

Pick up the bread, remove excess flour by slapping the dough between your hands and put it on the barbecue (or into the oven). Cook until bubbles have formed on top and the bottom side gets lightly coloured. Then flip, and cook until done, about 1 minute.

2016-08-02 15.10.01-1

Serve the chicken with pilaf, flat breads, green harissa and a sprinkle of za’atar spice. Enjoy and be proud of all the effort you put in!

2016-08-02 15.26.33-1

Breakfast winner: Navajo flatbreads with mushrooms and chorizo

2016-06-29 23.27.49

This brilliant breakfast idea came to me in my sleep, and I woke up feeling so excited that I jumped out of bed early in the morning (which rarely happens that easily) to make this delicious and hearty meal. I tell you what, they are not kidding when they say that you should eat breakfast like a king! I felt like an Energizer bunny all day…

Of course, this is also a fantastic brunch, picnic or barbecue option.

What I love about these flatbreads is that they are kind of like a fusion between a tortilla, pita and naan bread. You can play around with the spices and herbs added to the flour to see what flavours you like. I went for a bit of a Moroccan/Mediterranean flavour this time, but let me know what you came up with.

You can leave out the chorizo for a vegetarian/vegan option – just add more mushrooms in.

2016-06-26 11.23.57-1

Ingredients: 

  • 600 g plain flour, plus extra for dusting
  • 1 heaped teaspoon sea salt
  • 2 heaped tablespoons baking powder
  • 1 teaspoon dried herbs or spices, such as thyme, parsley, sumac or crushed fennel seeds , optional
  • 6 tablespoons olive oil
  • 150ml warm water
  • 5-6 button mushrooms, chopped
  • 1 chorizo sausage, chopped
  • 1 teaspoon dried thyme

Preparation:

Mix your flour, salt, baking powder and herbs or spices in a large bowl. Make a well in the middle and pour in the olive oil and water. Use a wooden spoon to mix the flour from the edge of the bowl. Once it starts to combine, use your hands to bring the dough together.

Dust your hands and a clean work surface with flour and knead the dough with your hands until it is smooth and elastic (about 5-10 minutes). Put the dough back into the bowl and let it rest for about 10 minutes.

Divide your dough into 10 equal balls, then lightly oil your hands and squeeze each ball between your palms to flatten them slightly. Roll them out with a rolling pin until they are about 10cm in diameter.

Normally the flatbreads are cooked as you’re making them. You can do this on a barbecue but I cooked them on a non-stick frying pan on medium heat (do not add any oil to the frying pan). Cook them for a few minutes on each side until puffy and golden. Keep them warm in a basket covered with a tea towel until you’re ready to serve them.

Meanwhile heat some oil in another frying pan on high heat. Add the chorizo and quick fry it for about 1 minute. Add the mushrooms and thyme. Fry for another minute (add more oil if needed as mushrooms can suck it up and turn out dry). Add the seasoning after the mushrooms are cooked (not before, or you will lose the mushroom flavour!).

Serve the bread, mushrooms and chorizo with a side of chutney or harissa and some good quality olive oil with a drop of balsamic vinegar.

2016-06-27 17.50.36


Ossobuchi alla milanese (or Osso Bucco)

You have probably noticed, I am quite fond of Italian food. Who isn’t though, right? Well let me introduce you to my old time favourite osso bucco, which translates into “bone with a hole”. Although traditionally made with veal shanks, it is basically a beef stew, which sounds much sexier pronounced in Italian 🙂 Nevertheless, it’s delicious in every language. Enjoy.

Note: the traditional accompaniment for osso bucco is risotto milanese, however I prefer it with some freshly baked focaccia or rosemary mash potato. 

2016-05-28 17.06.10-1

Serves 4

Ingredients:

  • 90g butter
  • 2 medium carrots, chopped finely
  • 2 large brown onions, chopped finely
  • 3 trimmed sticks celery, chopped finely
  • 3 cloves garlic, crushed
  • 2kg veal shin (you can use regular beef shin)
  • plain flour
  • 2 tablespoon olive oil
  • 2 cans of crushed tomatoes
  • 1/2 cup dry red wine
  • 1 3/4 cups beef stock
  • 1 tablespoon finely chopped fresh basil
  • 1 teaspoon finely chopped fresh thyme
  • 1 bay leaf
  • 1/2 lemon
  • 1/4 cup finely chopped parsley
  • 1 teaspoon grated lemon rind

Preparation:

Heat a third of the butter in a large saucepan. Add onion, celery, carrot, and half of the garlic and cook until onion is golden brown. Remove from heat. Transfer vegetables to large ovenproof dish.

Coat beef with flour. Heat the remaining butter and oil in pan. Add beef and brown well on each side. Carefully pack the meat on top of the vegetables.

Add the crushed tomatoes, wine, stock, basil, thyme, bayleaf and the lemon to the remaining fat in the pan, stir well and bring to boil.

Pour the sauce over the meat and the vegetables. Cover casserole and bake in about 160C for 1 1/2 – 2 hours or until the meat is very tender and falling off the bone.

To serve, sprinkle with combined remaining garlic, parsley and grated lemon rind.


French onion soup

I remember, when I was about to try the French onion soup for the first time, I cringed at the thought of eating onions boiled in water…who does that? Good thing, I was only 18 at the time, and had no idea about life (although I would have argued otherwise, as every 18 year old would).

This soup is a MUST have on your dinner (or lunch) menu. It is super simple to make, it’s strangely satisfying (must be all that cheese) and it’s just plain delicious.

Use the cheese of your preference…I know, the French will probably argue, but if you use the cheese you don’t like, you simply won’t enjoy this. True story.

2016-05-23 19.28.40-2

Serves 2

Ingredients:

  • 1 tbsp butter
  • 2 tbsp olive oil
  • 4 brown onions, finely sliced
  • 2-5 garlic cloves
  • 1 tsp brown sugar
  • 1/2 tsp dried thyme
  • 2 tbsp plain flour
  • 1/2 cu dry white wine
  • 6 cups beef stock (use vegetable, for vegetarian option)
  • 2 tbsp brandy (optional)
  • 6 slices French bread, toasted
  • 1 cup grated cheese of your preference (I used Gruyère)

Preparation:

In a large, heavy saucepan or flameproof casserole, heat the butter and oil over a medium heat. Add the onions and cook for 10 minutes until they are softened and beginning to brown.

Putting one garlic clove aside, finely chop the rest and add to the onions. Add the sugar and thyme and continue cooking over a medium heat for 30-35 minutes until the onions are well browned, stirring frequently.

Sprinkle over the flour and stir until well blended. Stir in the wine and stock and bring to boil. Skim off any foam that rises to the surface, then reduce the heat and simmer gently for 45 minutes. Stir in the brandy if using.

Preheat the grill. Rub each slice of toasted French bread with the remaining garlic clove. Place 2 ovenproof soup bowls on a baking sheet and fill about three-quarters full with the onion soup.

Float a piece of toast in each bowl. Top with grated cheese, dividing it evenly, and grill about 3-4 minutes until the cheese begins to bubble. Serve piping hot.


Risotto cakes with basil sauce and pancetta

Another Italian beauty, which is bound to wow your guests around the dinner table. It’s an awesome twist on a risotto. While this dish is incredibly simple (great to get kids involved for making the cakes), it is delicious and well balanced in flavours.

Note: Pancetta can be an expensive treat, so you can use good old bacon instead, but shhh don’t tell anyone).

2016-05-14 16.50.33-2

Ingredients:

  • 1/2 cup dry white wine
  • 1 medium brown onion
  • 2 cloves garlic, crushed
  • 1 cup arborio rice
  • 3 cups chicken stock (use vegetable stock if you are making this a vegetarian dish)
  • 2 tablespoons finely chopped fresh parsley
  • 2 tablespoons finely chopped fresh chives
  • 2 tablespoons finely grated parmesan cheese
  • 1 egg, beaten lightly
  • 4 slices pancetta (leave this out for vegetarian option)
  • Handful of rocket leaves

basil sauce 

  • 1 teaspoon cornflower
  • 1 teaspoon water
  • 3/4 cup low-fat greek yoghurt
  • 1 tablespoon coarsely chopped fresh basil
  • salt, pepper to season

Preparation:

Heat 2 tablespoons of the wine in a large saucepan; cook onion and garlic, stirring, about 2 minutes or until onion softens.

Add rice and remaining wine; cook stirring, about 3 minutes or until the wine reduces by half. Stir in stock gradually in parts, making sure the rice absorbs the stock before adding more. Once the rice is cooked, remove from heat; stir in parsley, chives and cheese. Cool; stir in the egg. Using wet hands, shape risotto mixture into four patties. (Can be made ahead to this stage and refrigerated, covered).

Preheat oven to 250C. Place pancetta on oven tray and bake uncovered about 5 minutes or until crisp; drain on absorbent paper. Break pancetta into pieces.

Cook risotto cakes in large heated lightly oiled frying pan until brown on both sides. Place cakes on oven tray; bake uncovered at 180C about 10 minutes or until hot.

Serve risotto cakes on rocket leaves. Drizzle with basil sauce; top with pancetta.

basil sauce: blend cornflour with the water in a small saucepan; add yoghurt. Stir over heat until mixture boils and thickens slightly; season and stir in basil.

Zucchini rolls with minced pork and basil ricotta 

These little rolls are a delicious treat. Although not the quickest to make, due to some fiddly rolling, they are totally worth it and look so impressive on a plate.

The filling is very versatile too and you can use your favourite ingredients. I would actually love to hear what you would use for a filling, so leave a comment for me and let me know!

The tomato sauce is easy and delicious and can be preserved or frozen for future use. Make the most of the tomato season by making this sauce in advance. You will thank me later 🙂 Find the tomato sauce recipe under the preserves category.

Serves 4

Ingredients:

  • 2 medium or large size zucchinis (large ones will make the rolling easier)
  • 1 brown onion, chopped
  • 3 garlic cloves, grated
  • 400g lean pork mince
  • 2 tsp dried herbs (such as oregano, thyme, basil)
  • 1/2 cup ricotta cheese
  • 2 tbsp basil pesto
  • 1 cup tomato sauce (recipe in preserve category)
  • Salt, pepper to season
  • Olive oil for final drizzle
  • Toothpicks for securing the rolls

Preparation:

Using a large vegetable peeler, peel the zucchinis into thin strips. You could slice them with a knife but the peeler would make the process much easier. Set the strips aside.

Meanwhile heat a grill pan to high heat. Grill the zucchini on the pan, until you get nice charred stripes and the zucchinis are softened. Set aside.

Mix the ricotta cheese and basil pesto until combined and set aside.

Heat a pan to med-high heat. Drizzle with some olive oil. Add the onion and fry until soft and fragrant. Add the garlic. Fry for a few minutes. Add the pork mince and dried herbs, salt, pepper and fry until mince is cooked (about 5-10 min). Set aside.

Ok time to roll. Place a couple of zucchini strips overlapping each other, so your mixture wont fall out. Spoon some pork  over the strips, top with basil ricotta and roll very gently ensuring the mixture stays in. Use the toothpicks to pin the roll so it stays in place. Repeat with the remaining zucchini strips.

Place the rolls carefully into a preheated pan, top with tomato sauce. Cover with a lid and simmer on gentle heat for about 10 minutes. Remove the toothpicks carefully with a pair of tongs before serving the rolls. You wouldn’t want people to chew on one of those.

Drizzle the rolls before serving with olive oil. Enjoy.

Neapolitan spaghetti

Neapolitan pasta sauce is a simple Italian tomato based sauce, which slightly varies from region to region. I have decided to give it my own twist, while still using authentic ingredients. This is a vegetarian sauce but it can be served over meat such as mince or sausages. It is a great way to get your kids to eat the vegetables too, as they are hidden.

Simple, delicious and quick meal, which is a real family pleaser. Let me know how you go.

2016-04-05 17.45.47

Serves 4

Ingredients:

  • 1 onion, chopped
  • 3 cloves of garlic, chopped,
  • 1 carrot, chopped
  • 2 celery sticks, chopped
  • 1 mild chilli pepper (or you can use a hot one if you wish)
  • 1 capsicum, chopped
  • 130ml white wine
  • 2-3 large, ripe tomatoes, roughly chopped
  • 1 bay leaf
  • pinch of each dry oregano and thyme
  • handful of chopped fresh basil
  • salt, pepper to taste
  • 350g dried spaghetti
  • freshly grated Parmesan cheese to serve

Preparation:

Preheat a tbsp of olive oil in a heavy-based saucepan to med-high heat. Fry off the onions and garlic until golden and fragrant. Add the carrots and celery and fry for another couple of minutes. Add the wine, tomatoes, thyme, oregano and bay leaf. Close with a tight fitting lid, lower the heat and simmer for 40-45 minutes, stirring occasionally, until the vegetables are tender, but not mushy. Take off the heat and set aside.

Cook spaghetti in a boiling seasoned water until al dente. You do not want to over cook the pasta, as it will continue cooking in the sauce. Drain the pasta when it’s ready reserving about a cup of the starchy water, as it will help to marry your pasta and the sauce (how romantic!).

Add the fresh basil to the sauce and blend the sauce to a desired consistency. You can leave it a bit chunky, or you can have a nice smooth sauce if you wish. Return the sauce to the saucepan and reheat. Add the spaghetti and the starchy water and mix well with the sauce.

Dish into bowls, garnish with some Parmesan and serve immediately.

Happy days!


Harissa chicken with couscous salad

Chicken is a fantastic type of meat as it is extremely versatile, it can take on a variety of flavours, like this Moroccan-style couscous salad, which is super quick to make too.

I have made my own harissa paste for this dish and I have provided the recipe for it below, but you can also use store-bought harissa.

Check with your local butcher for a free-range chicken, as it’s more sustainable and healthy, not to mention tastes better!

I’d love to hear your take on couscous salads, as those are fantastic and super versatile. Leave a comment. I’d love to hear from you.

2016-03-30 18.29.49

Serves 4

Ingredients:

  • 500g free range skinless, boneless chicken breast
  • 1 tbsp harissa rub (either use pre-made store mix, or combine 1/2 tsp of each: ground caraway, sweet paprika, smoked paprika, cumin, coriander, celery, cayenne, salt, sugar, garlic powder and dry mint. You can save the rest of the spice mix for later, just store it in an air tight container)
  • 1 cup couscous
  • 1 cube organic chicken stock
  • 2 cups boiling water
  • 1 cup chopped fresh mint
  • 1 cup chopped fresh parsley
  • 1/2 cup chopped fresh basil
  • 2 spring onions, thinly sliced
  • 1 carrot, peeled, cut into thin matchsticks
  • 2 vine-ripened tomatoes
  • 50g feta cheese
  • 1/4 cup toasted pine nuts
  • 1/2 cup toasted sunflower seeds
  • Juice and rind of 1/2 lemon
  • 1/2 lemon
  • 1/2 cup plain Greek yoghurt
  • 1 tbsp harissa paste (see below for recipe, it can be made several days in advance and stored in the fridge)
  • Fresh rocket salad (or lettuce of your choice)
  • Olive oil

Preparation:

Place the chicken breast on a sheet of baking paper on your bench. From a high sprinkle the harissa rub all over the chicken. Move the chicken around so you pick up all the spice. Cover with another piece of baking paper and whack the chicken with a rolling pin (you can use your fist, it helps after a long day at work too) until it’s about 1.5cm thick. This will tenderise the chicken, get the flavour in and speed up your cooking process. Set aside.

While the chicken is marinading, let’s get the salad ready. Put the couscous in a bowl, crumble the stock cube in and pour the boiling water. The ratio of 1 cup of couscous and 2 cups of boiling water works every time, and makes enough for 4 people. Stir and cover with a lid. Set aside. This will be ready in about 3 minutes. Take off the lid and fluff it with a fork. Let it cool to warm temperature.

Meanwhile, in a separate bowl mix the herbs, carrots, spring onion, tomatoes, feta, lemon juice and rind. Add the couscous and mix together. Taste for seasoning. Set aside.

Heat a griddle pan to high. Drizzle some olive oil over the chicken and rub all over. Place on the griddle pan and grill for about 3 minutes on each side, or until cooked through. Set aside to rest. Pop a lemon half, cut-side down, at the side of the griddle pan for 1 min.

Arrange the couscous salad on a serving plate with the side of salad and the yoghurt topped with harissa paste. Slice the chicken and place on top of the couscous. Drizzle with olive oil and serve immediately.

Happy days!

2016-03-30 18.30.20

For harissa paste:

Makes about 1 1/4 cups

  • 1 large red bell pepper
  • 2 dried chilies
  • 3 sun-dried tomatoes, dry-packed
  • 2 clove garlic, peeled
  • 1 teaspoon salt
  • 3/4 teaspoon ground coriander (1 1/2 teaspoons seeds, toasted and ground)
  • 1/2 teaspoon ground caraway (or 1 teaspoon seeds, toasted and ground)
  • 1/2 teaspoon ground cumin (or 1 teaspoon seeds, toasted and ground)
  • 1 tablespoon olive oil, plus extra for storage

Roast your red pepper by placing it over a gas flame, turning occasionally, until the skin blackens all around. If you do not have a gas cooker, roast it in the oven at 200C until softened. Set aside to cool. Once cool enough to handle, peel and seed the pepper.

Meanwhile, place dried chiles and sundried tomato in a bowl and cover with boiling water. Let sit for 30 minutes, until well-softened.

Place roasted red pepper, rehydrated chillies, tomatoes, garlic, salt and spices in a blender or food processor with 1 tablespoon olive oil and blend until it becomes a thick paste; a little water may be necessary to help this along. Store in the fridge, topped with a thin layer of olive oil.