Breakfast winner: Navajo flatbreads with mushrooms and chorizo

2016-06-29 23.27.49

This brilliant breakfast idea came to me in my sleep, and I woke up feeling so excited that I jumped out of bed early in the morning (which rarely happens that easily) to make this delicious and hearty meal. I tell you what, they are not kidding when they say that you should eat breakfast like a king! I felt like an Energizer bunny all day…

Of course, this is also a fantastic brunch, picnic or barbecue option.

What I love about these flatbreads is that they are kind of like a fusion between a tortilla, pita and naan bread. You can play around with the spices and herbs added to the flour to see what flavours you like. I went for a bit of a Moroccan/Mediterranean flavour this time, but let me know what you came up with.

You can leave out the chorizo for a vegetarian/vegan option – just add more mushrooms in.

2016-06-26 11.23.57-1

Ingredients: 

  • 600 g plain flour, plus extra for dusting
  • 1 heaped teaspoon sea salt
  • 2 heaped tablespoons baking powder
  • 1 teaspoon dried herbs or spices, such as thyme, parsley, sumac or crushed fennel seeds , optional
  • 6 tablespoons olive oil
  • 150ml warm water
  • 5-6 button mushrooms, chopped
  • 1 chorizo sausage, chopped
  • 1 teaspoon dried thyme

Preparation:

Mix your flour, salt, baking powder and herbs or spices in a large bowl. Make a well in the middle and pour in the olive oil and water. Use a wooden spoon to mix the flour from the edge of the bowl. Once it starts to combine, use your hands to bring the dough together.

Dust your hands and a clean work surface with flour and knead the dough with your hands until it is smooth and elastic (about 5-10 minutes). Put the dough back into the bowl and let it rest for about 10 minutes.

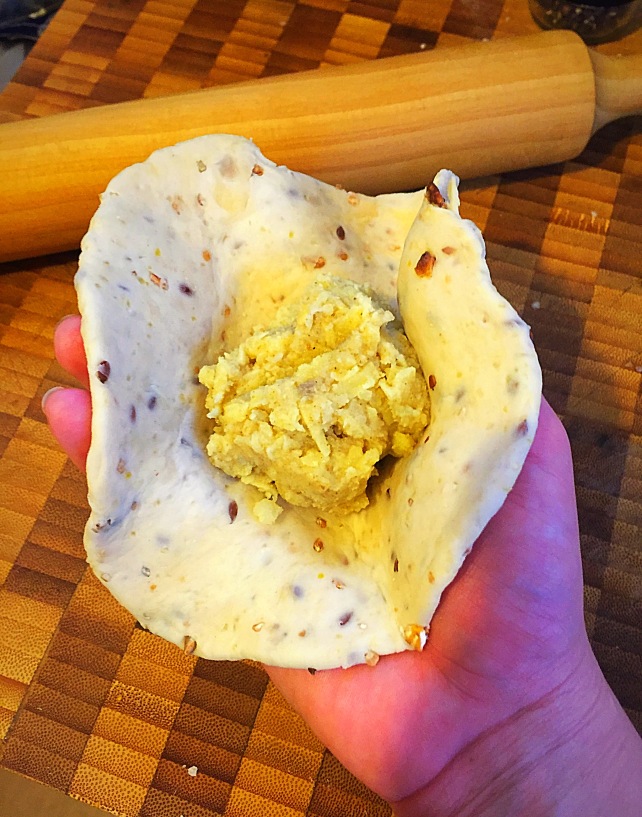
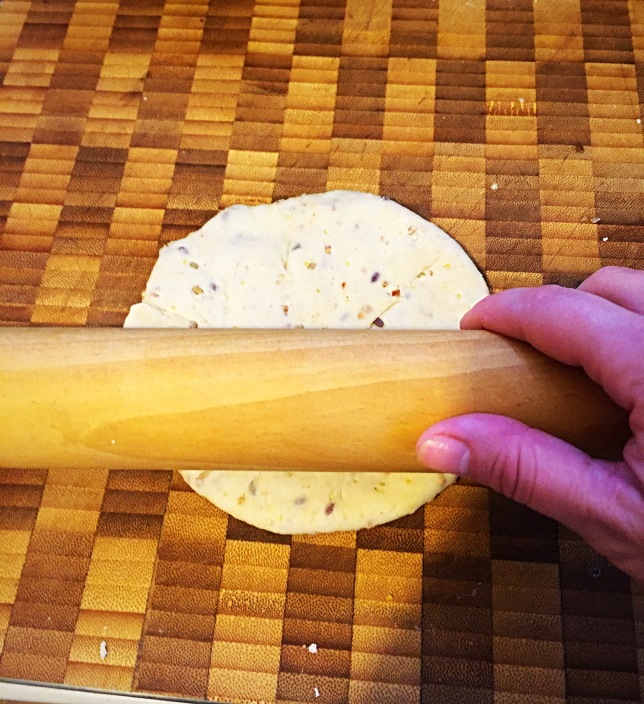
Divide your dough into 10 equal balls, then lightly oil your hands and squeeze each ball between your palms to flatten them slightly. Roll them out with a rolling pin until they are about 10cm in diameter.

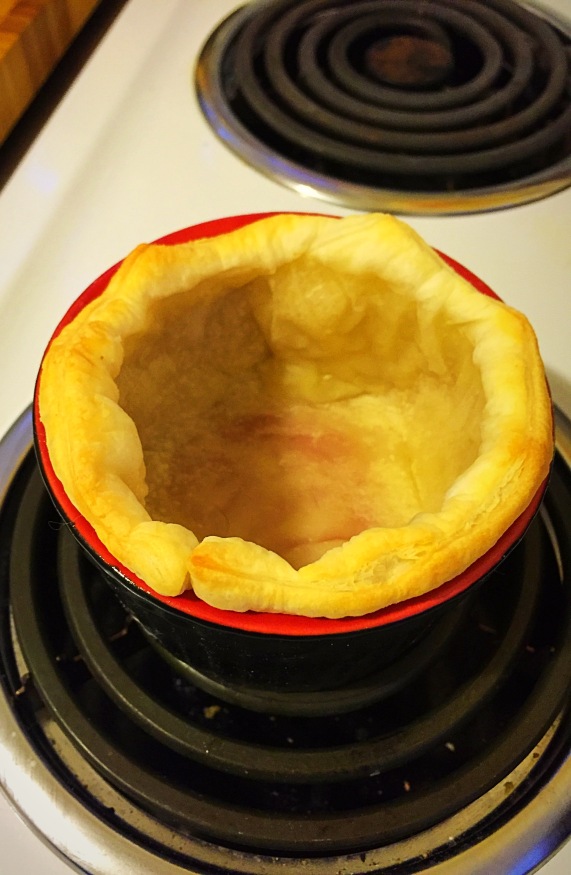
Normally the flatbreads are cooked as you’re making them. You can do this on a barbecue but I cooked them on a non-stick frying pan on medium heat (do not add any oil to the frying pan). Cook them for a few minutes on each side until puffy and golden. Keep them warm in a basket covered with a tea towel until you’re ready to serve them.

Meanwhile heat some oil in another frying pan on high heat. Add the chorizo and quick fry it for about 1 minute. Add the mushrooms and thyme. Fry for another minute (add more oil if needed as mushrooms can suck it up and turn out dry). Add the seasoning after the mushrooms are cooked (not before, or you will lose the mushroom flavour!).

Serve the bread, mushrooms and chorizo with a side of chutney or harissa and some good quality olive oil with a drop of balsamic vinegar.

2016-06-27 17.50.36


Gin and tonic cake

Yes…you heard it right…Your favourite cocktail in a cake. Do I need to say more?

2016-06-27 17.51.57-2

We are having miserable weather here in New Zealand…rain, cold, wind.. However I cannot complain, because my orange trees are going crazy with fruit! Here is my harvest from this morning:

2016-06-26 16.24.56

It’s about 13kgs…so my workout for the day included carrying this basket back into the house from the garden (I managed to break the handle as you can see)

2016-06-26 13.39.05

But whoah! That is a lot of oranges! So expect a lot of orange recipes from me in the near future 😀

But let’s get back to this boozy deliciousness…

This cake is super moist, fluffy and packed with citrus flavours. I know that the usual Gin and Tonic cocktail has lemon in it, so feel free to use the lemon in this cake instead of the orange, however, as I mentioned above, I just picked enough oranges to last me through an apocalypse, so I decided that citrus is citrus…and oranges taste better than lemons anyway 😀

Don’t worry, you won’t be dancing on the table after having this cake. The alcohol from the gin will evaporate with cooking, but it will make your cake super fluffy.

2016-06-26 16.59.38-1

Serve this cake with some low-fat Greek yoghurt and orange syrup. Yum.

Ingredients:

  • 200g butter, softened, plus extra for greasing
  • 200g caster sugar
  • 4 large eggs
  • 300g plain flour
  • 75g plain Greek yoghurt
  • 3 tbsp gin
  • 3 oranges (or lemons), zested (you’ll use the juice in the syrup)

Syrup

  • 5 oranges, juiced (this includes the zested oranges from above) plus 2 small oranges, sliced, end slices discarded
  • 125g caster sugar
  • 6 tbsp tonic water
  • 2 tbsp gin

Preparation:

Heat the oven to 160C. Line and grease a cake tin.

Beat the butter and sugar together until pale and fluffy, then beat in the eggs, one at a time.2016-06-26 15.21.00-1

Beat in the yogurt, then tip in the flour but fold in with a metal spoon. Finally fold in the gin and lemon zest.

Spoon the mix into the tin and bake for 1 hour – 1 hour 10 minutes until risen and golden, and a skewer inserted into the centre comes out clean.

Check it out:

2016-06-26 16.43.56-1

This is what it should look like when you peel off the baking paper. Happy days!

2016-06-26 16.47.30-1

Meanwhile, make the syrup by combining the orange juice, sugar and tonic water in a wide pan. Heat gently until the sugar has dissolved, then drop in the orange slices and bubble for a few minutes, until the syrup thickens slightly. Don’t go overboard, or you will end up with a jelly marmalade.

2016-06-26 16.09.09-1

Take off the heat, stir in the gin, and leave to cool.

Cool the cake in the tin for 10 minutes, then turn it out upside down onto a serving plate and poke a few holes over the base.Spoon over about half of the syrup to soak in.

2016-06-26 16.49.04-1

To serve, spoon the rest of the syrup and lemon slices over the cake, letting some soak in before adding more. Then serve the cake cut into thin slices with spoonfuls yoghurt on the side.

2016-06-26 16.58.59-1

Garlic and cheese parathas

2016-06-21 20.44.57-2

If you are after a great, delicious, easy and very cost efficient lunch idea, try these garlic and cheese parathas.

The idea came to me today, as I try to be organised with my lunch and I really dislike a boring lunch box…REALLY. So I thought what could be better than a warm tasty paratha with a nice cheese and potato filling? I got your attention now, I bet?

While these are so amazing fresh off the grill, they are actually great the next day too. You can reheat them or have them cold. You can also freeze them (while uncooked) and pull one out as you please and cook from frozen. Yep. That good. So give it a go 🙂

Makes 8

Ingredients:

  • 2 cups plain wholemeal flour
  • 2 cups plain white flour
  • 60g ghee (can substitute with butter)
  • 1 cup warm water
  • 1 cup mashed potato
  • 1-2 garlic cloves, grated
  • 2 cups grated cheese
  • 1 tsp ground cumin
  • 1 tsp ground coriander
  • 1 tsp garam masala
  • 1-2 tbsp milk (or water)
  • oil for frying

Preparation:

Sift flour into the bowl, return husks from sifter to the bowl. Rub in ghee or butter, add water, mix to a firm dough. Knead on lightly floured surface for 5 minutes or until smooth. Cover, stand for 10 minutes.

Meanwhile combine potato, garlic, spices and cheese in a bowl. Add milk or water to help the mixture stick together and mix well.

Divide dough into 8 portions, press each portion into a 10 cm round with hands. Place a tablespoon of potato mixture onto each round. Gather edges to enclose filling.

2016-06-21 15.36.10

Roll into a ball, then roll out to another 10 cm circle.

2016-06-21 15.37.57

Heat oil in a frying pan, or a barbecue plate. Cook on each side until crisp and golden brown.

Delish!

2016-06-21 16.41.07-2

Chelsea buns

2016-06-19 21.12.29

After I posted a recipe of a pulled beef, ale and mushroom pie for Queen’s birthday, I had requests to post something else that was traditionally British. I thought what could be more British than Chelsea buns? They were first created in the 18th century at the old Chelsea Bun House, which was sadly destroyed in 1839. However, the Chelsea bun making tradition continued and spread through the world.

These cuties are small, soft, plump and sweet. I absolutely love the hidden caramel fruitiness in them. Unfortunately, rumour has it, Chelsea buns are losing their popularity with all the amazing and fancy pastry out there – so I wanted to remind people that traditional and simple baking can be trendy and impressive too. This is coming from a non-impressive baker like me, who manages to stuff up the baking nearly every time. So if I can make these, you can too.

2016-06-16 14.11.39-1

Send me some traditional recipes that you enjoy, perhaps that have been passed on to you through generations. I love hearing the stories behind family recipes too!

2016-06-19 16.53.44-1

Makes 16

Ingredients:

  • 3 cups plain flour
  • 3 tsp baking powder
  • 125g butter, chopped
  • 1 tsp mixed spice
  • 60g butter extra
  • 1/4 cup brown sugar
  • 1 cup mixed dried fruit, such as sultanas, cranberry, cherries etc
  • rind of one orange

Glaze

  • 1 tbsp milk
  • 2 tbsp sugar

Glacé icing

  • 1/2 cup icing sugar
  • 1 tbsp milk

Preparation:

Preheat oven to 200C and grease a baking tray.

Sift flour, baking powder and half of mixed spice into a bowl. Using finger tips or a pastry blender, rub in half the butter to make crumbs.

2016-06-16 14.12.52-1

2016-06-16 14.13.17-1

Using a round- bladed knife, stir in milk to make a soft sticky dough. Knead for a few minutes until smooth.

Turn out onto a lightly floured surface; roll out to a 40x25cm rectangle. I used a tray to guide my rolling. It made it easier to keep the shape and to work with.

2016-06-19 15.47.40-2

Using an electric mixer, beat remaining butter and brown sugar in a small bowl until light and creamy. Spread butter mixture over dough, leaving a 1 cm border.

Scatter dried fruit, orange rind and remaining mixed spice over butter on dough.

2016-06-19 16.00.16-2

Roll the dough lengthways, firmly and evenly into a log, swiss-roll style. Cut the roll into 16 slices. Arrange the slices, close together, on the baking tray. Place the seams inwards and flatten the pieces slightly.

2016-06-19 16.08.23-2

Bake the buns for 20 minutes, or until browned and cooked through. To make the glaze, put the milk and sugar in a small pan. Stir over low heat until the sugar dissolves and the mixture is almost boiling. Remove from the heat, brush liberally over the buns and transfer them to a wire rack to cool.

2016-06-19 16.46.22-1

To make the glacé icing, mix together the icing sugar and milk, and stir until smooth. Drizzle over the glazed and cooled buns. Serve with a nice cup of Earl Grey or English Breakfast tea.

2016-06-19 16.55.17-1

Pumpkin and orange scones

Don’t you just get sick of waiting for holidays to come around? I mean why do we have to wait an entire year for a Christmas tree? Or for Thanksgiving and the pumpkin pie? It’s just not fair!

Well I’m gonna let you in on my little secret how I keep the holiday spirit going throughout the year (and no I do not keep my Christmas tree up the whole year around, although the thought had crossed my mind). I practice festive dishes! So not only I get to have that pumpkin pie whenever I wish (not when the calendar tells me to), but also when it comes to the actual holidays, I know that I have mastered the dish and it will impress the guests. I mean, how many of you have seen a recipe for a perfect birthday cake and thought yea that looks easy enough! Only to make it on the occasion and it turns out to be a total mess! I can’t be the only one. Well my friends, practice makes perfect 🙂

So today I decided to make these pumpkin and orange scones. It’s not quite the pumpkin pie, but these are great on the Thanksgiving or Christmas table. Best part is they have zero sugar in them, so they are on a healthy side. I found that the sweetness from the pumpkin and the raisins was enough. Also you can have these with some marmalade if you have a sweet tooth 🙂

So do use this recipe as an excuse to bring the holidays closer since it’s only June…Do you have a festive recipe that you cook all year around? Let me know, I’d love to hear!

2016-06-13 17.15.19

Makes 9

Ingredients:

  • 2 1/2 cups plain flour
  • 2 1/2 tsp baking powder
  • a pinch of salt
  • 1 tsp mixed spice
  • 1/2 tsp ground ginger
  • 1/2 tsp ground cinnamon
  • 60 g butter, chopped
  • 1 egg lightly beaten
  • 1 cup cooked, mashed pumpkin
  • Zest of one orange
  • 1/2 cup raisins
  • 1/2 tbsp milk, extra, for glazing
  • Mixture of pumpkin and sunflower seeds

Preparation:

Preheat the oven to 210C. Grease a 28 x 18cm shallow tin.

Sift the flour and baking powder into a large bowl. Stir in the spices and salt. Add the chopped butter. Using your fingertips, rub in the butter until the mixture is fine and crumbly.

Combine the egg, mashed pumpkin, zest of orange, raisins and milk. Add to the flour mixture and stir with a knife until just combined.

Put the dough into the tin, spreading evenly. Brush the top with extra milk. Sprinkle with seeds. Bake for about 30 min, or until the tops of the scones are lightly golden (this process will depend on your oven, and the dish you are using, so if you see the tops browning up, the scones are done). Cut the scones into 9 even pieces. Turn out onto a wire rack to cool.

Serve warm or cold, with butter or some marmalade.

Knockout pulled beef, ale, cheese and mushroom pie

Today in New Zealand we are celebrating Queen’s birthday, so I thought I’d honour the Brits with a good old pie. I mean who doesn’t like a pie? It’s warm, flaky, filling, delicious and cheap to make.

2016-06-06 16.37.42

The pies however are the best when made with a slow cooked filling, which is what I did here…so it took me 2 days to make these beauties, but they were totally worth it. I had some filling left over (I get greedy and make too much), so I’m planning to turn it into a pasta dish tomorrow by mixing it through some cooked penne or spaghetti. Yum.

2016-06-06 16.43.09

I also decided to make small pies rather than a big one, as it’s a great lunch idea for the next day, and last thing you want to put into your lunch box is a slice of sloppy mess. However, these little darlings are nothing like that. They are cute and fit perfectly into the lunch box. Ah stop it!

On the final note: there is no shame in using store bought puff pastry. It’s ridiculously difficult and time consuming to make and if you get it wrong, you’ll end up with no puffs, so unless you are applying for a cooking competition, the supermarket will provide perfect pastry (even Jamie Oliver uses ready made pastry, but don’t tell him I told you).

Let’s make the pie shall we?

2016-06-06 16.40.22

Makes 4

Ingredients:

  • 400g ready rolled puff pastry
  • 2 tbsp vegetable oil
  • 500g braising steak (buy this as a whole piece and cut it yourself into large chunks)
  • 1 large onion, roughly chopped
  • 2 large carrots, chopped into large chunks
  • 1 tsp golden caster sugar
  • 2 tbsp plain flour
  • 200ml dark ale
  • 1 cup beef stock
  • 2 tsp dried thyme
  • 1-2 bay leaves
  • 2 tsp fresh parsley, finely chopped
  • 200g smoked bacon chopped rashers
  • 200g portobello mushroom, chopped
  • 50 g cheddar cheese cut into small cubes
  • 1 egg, lightly beaten

Preparation: 

Start by braising the beef.Heat the oil in a deep saucepan, brown the meat really well in batches, then set aside.

2016-06-05 17.58.29-1

Add the onions and carrots to the pan, adding a drizzle more oil, then cook on a low heat for 5 mins until coloured, scatter over the sugar and flour, stirring until the flour turns brown. Tip the meat and any juices back into the pan and give it all a good stir. Pour over the ale and stock. Season stew, tuck in the herbs and bring everything to a simmer. Cover with a lid and cook over very low heat for about 2 hrs, until the meat is really tender.

While the stew is cooking, heat a drop more oil in a frying pan and sizzle the bacon for 3 mins until crisp. Turn up the heat, add the mushrooms and cook for 4 mins until golden. Remove from the heat and set aside.

Once the stew is cooked, take the meat out and set aside to cool a little. Use a fork to shred the beef. Add the shredded beef back into the stew, throw in the bacon and mushroom mixture and stir it through.

2016-06-06 11.41.24-1

Leave everything to cool completely – better still, make this up to 2 days in advance and keep it in the fridge as the pie will be better if the filling is fridge-cold when added. Can also be frozen for up to 3 months and defrosted when needed.

When you want to make the pie, heat oven to 200C fan and place a flat baking tray in the oven. Heavily grease 4 soufflé size ramekins, or small pie dishes and dust well with flour. Line the ramekins with pastry, pressing the pastry lightly into the walls and cutting the excess pastry at the top of the ramekins. Place baking paper on top of the pastry and fill the ramekins with beans or rice. Blind bake the pastry for about 15 minutes. Take the beans and baking paper out. This step is necessary to avoid the soggy bottom of the pie. You want it crispy all around, so blind baking it first will help to achieve that.

2016-06-06 15.23.53

2016-06-06 17.19.43

Fill the ramekins about 3/4 way with the beef filling using a slotted spoon so the gravy is left in the sauce pan, as you don’t want too much sauce in the pie itself. Push 3-4 cheese cubes into the meat mixture.

2016-06-06 17.21.15

Brush the edges of the pastry with beaten egg. Cut out tops from the pastry, which are slightly bigger in the diameter than the ramekin. Place the pastry on top of the pie and press the edges lightly into the walls of the blind baked pastry, avoiding crushing. Use pastry trimmings to make decorations like leaves or flowers if you like. Brush the top heavily with egg. Make a slit in the centre of the pie to allow steam to escape. Place on the hot baking tray, then bake for about 20-25 minutes until the top is golden brown. Leave the pie to rest for 10 minutes, while you heat up the left over gravy.

2016-06-06 16.38.20

Serve the pie at the table with a jug of gravy and a big pile of something green.

2016-06-06 16.41.02

Yum!

2016-06-06 16.41.52

Feijoa and cinnamon loaf

I decided to put another feijoa recipe up for a few reasons. I like to cook in season, so as the feijoas are falling off the trees around here, it’s a fantastic opportunity to experiment. I also want to show that feijoa is versatile, so next time you stumble across some feijoas, you don’t wonder what you could do with them. Lastly, I love feijoas and I don’t need a reason.

This recipe is great. It’s simple, quick, cheap and delicious. What else could you want? It’s also fantastic for breakfast, brunch or a little snack…mmmmm. Let’s get on with it, shell we?

2016-06-02 20.55.03

Ingredients:

  • 1 cup peeled & chopped feijoas
  • 1 cup boiled water
  • 1 cup brown sugar
  • 1 tsp cinnamon
  • 50g butter
  • 1 egg
  • 2 cups plain flour
  • 2 tsp baking powder

Preparation:

Place feijoas, boiling water, cinnamon, brown sugar and butter into a pot. Simmer for 5 minutes, cool slightly, then beat in your egg, flour, and baking soda.

Pour into a loaf tin & bake in a preheated oven at 180°C for 45-50 minutes.

That’s it. Told you it was simple.

2016-06-02 16.52.09